Ruby on rails学习:用Rails开始一个项目(CMS)
记录一下rails开始一个项目的流程,以一个简单的cms的搭建为例
🕐
新建项目
- 在git上新建一个项目
hfzedu-cms git clone到本地- 到
hfzedu-cms目录,执行新建命令
# 正常的步骤
git clone git@github.com:aric-juzi/hfzedu-cms.git
cd hfzedu-cms
# 指定数据库为 mysql(默认为 sqlite3)
rails new . -d mysql
# 一般国内安装慢,可以替换下 Gemfile 里的安装源
source "https://gems.ruby-china.com"
# 升级 bundler
gem install bundler:2.2.30
创建项目相关的 model
# users
rails g model User username:string
# other models.
# ....
执行表的创建
rake db:migrate添加一个类型+索引+uniq的字段
rails g model Category slug:string:uniq多级分类的管理
gem "ancestry"添加一个管理员用户
# 1. add gen & bundle install
gem 'rails_jwt_admin'

# 2. install admin
rails g rails_jwt_admin:install

# 3. check table & rake db:migrate
rake db:migrate
添加测试用户
RailsJwtAdmin::User.create(
    username: "admin",
    email: "example@qq.com",
    password: "123123",
    password_confirmation: "123123"
)
添加分类 ancestry
gem "ancestry"class Category < ApplicationRecord
include Slugable
has_ancestry
end## 添加分类
c1 = Category.create(title: 'Php')
c2 = Category.create(title: 'Python')
## 添加子分类方式1
c1.children.create({ title: "php教程" })
c1.children.create({ title: "php文档" })
## 添加子分类方式2
c3 = Category.create(title: "php笔记")
c3.parent = c1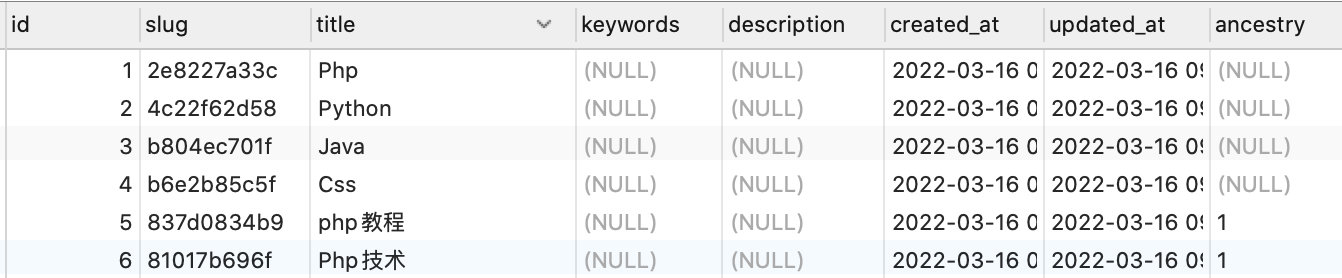
安装 act-as-taggable gem
# 添加 act-as-taggable 库
gem 'acts-as-taggable-on', '~> 9.0'
# 添加 migrations
rake acts_as_taggable_on_engine:install:migrations
# bundle install
act-as-taggable常用功能
- posts(含有多个tags)
- tags(含有多个posts)
| 功能 | 代码 |
|---|---|
添加 tags 功能 | |
| 使用最多/最少的标签 | |
| 根据条件得到posts | |
| 当天创建的内容 | |
| 定时发布核心功能 | |
常用命令
| 功能 | 命令 |
|---|---|
生成 secret_key_base 的 key | |
sitemap <sitemap_generator> 常用命令
rake sitemap:clean                                     # Delete all Sitemap files in public/ directory
rake sitemap:create                                    # Generate sitemaps but don't ping search engines
rake sitemap:install                                   # Install a default config/sitemap.rb file
rake sitemap:refresh                                   # Generate sitemaps and ping search engines
rake sitemap:refresh:no_ping                           # Generate sitemaps but don't ping search engines
安装以及基本配置
# 安装
gem install sitemap_generator
# 添加配置 config/sitemap.rb
rake sitemap:install
一个 rails 的 cms 里的 sitemap.rb
# Set the host name for URL creation
# Not sitemap.xml.gz but sitemap.xml
SitemapGenerator::Sitemap.compress = false
SitemapGenerator::Sitemap.default_host = "https://www.example.com"

SitemapGenerator::Sitemap.create do
  # Put links creation logic here.
  #
  # The root path '/' and sitemap index file are added automatically for you.
  # Links are added to the Sitemap in the order they are specified.
  #
  # Usage: add(path, options={})
  #        (default options are used if you don't specify)
  #
  # Defaults: :priority => 0.5, :changefreq => 'weekly',
  #           :lastmod => Time.now, :host => default_host
  #
  # Examples:
  #
  # Add '/articles'
  #
  #   add articles_path, :priority => 0.7, :changefreq => 'daily'
  #
  # Add all articles:
  #
  #   Article.find_each do |article|
  #     add article_path(article), :lastmod => article.updated_at
  #   end

  add "/", :changefreq => "daily", :priority => 0.9

  Post.find_each do |item|
    add post_path(item.slug, format: :html), :lastmod => item.updated_at, priority: 0.8, changefreq: "daily"
  end

  ActsAsTaggableOn::Tag.find_each do |item|
    add "/tags/#{item.id}.html", :lastmod => item.updated_at, priority: 0.7, changefreq: 'daily'
  end

  Category.find_each do |item|
    add category_path(item.slug, format: :html), :lastmod => item.updated_at, priority: 0.2, changefreq: "monthly"
  end
end
添加每天的定时任务 config/schedule.rb
# sitemap
every 1.day, :at => '3:00 am' do
  rake 'rake sitemap:refresh', :environment => ENV['RAILS_ENV'] || 'development'
end
首次运行
RAILS_ENV=production bundle exec rake sitemap:refresh缓存你的 gem
适合一些基本不动的网站,不用运行 bundle install 等
bundle cache